


Mazda Metal Window Switch Stickers: Easy Interior Refresh
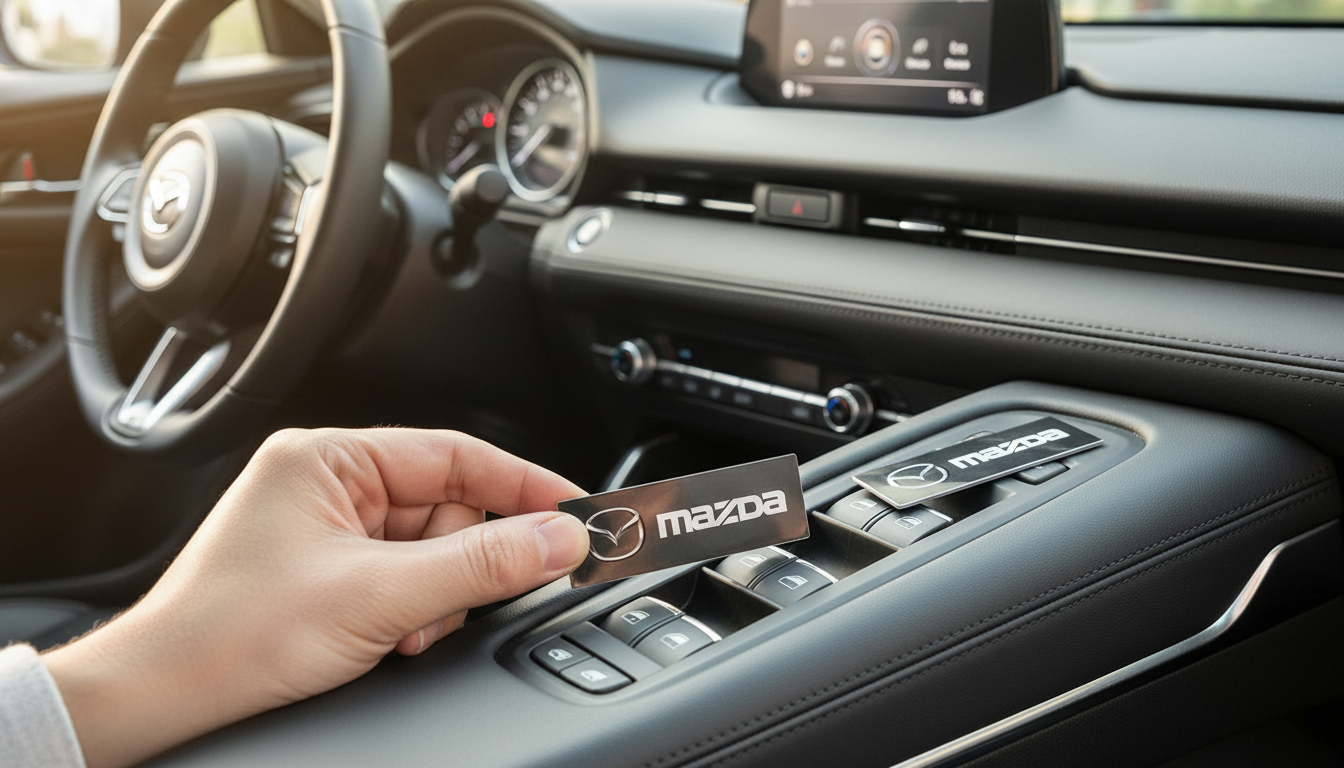
Metal Car Window Lift Button Stickers for Mazda: A Small Upgrade That Keeps Your Cabin Looking Sharp
Small interior details can make a big difference in how a cabin looks and feels day to day. Metal window lift button stickers add a cleaner, more finished look around the switches while also helping reduce the appearance of scuffs and wear on frequently touched areas. For Mazda owners who notice shine spots around the driver’s controls or want a more uniform metallic accent, these slim overlays can be a quick, low-effort refresh—without tearing into panels or replacing parts.
If you’re ready to upgrade the look of your switch area, the Metal Car Window Lift Button Stickers for Mazda are an easy starting point. Pairing the install with a small detailing tool like the 3-in-1 Bottle Gap Cleaner Brush can also help you clean tight edges around the buttons before you stick anything down.
What These Stickers Do (and What They Don’t)
- Add a metallic accent around the window lift controls for a more refined, uniform look
- Help mask light cosmetic wear like micro-scratches and shine spots on the original trim
- Maintain normal button travel when applied flat and centered
- Do not repair broken switches or fix peeling OEM coatings—those issues require parts replacement
Think of metal button stickers as a cosmetic “top layer.” They’re best when the underlying panel is intact but looks tired from daily use. If your switch surfaces are peeling or your buttons feel inconsistent, it’s smarter to address the mechanical issue first and then finish with cosmetic upgrades.
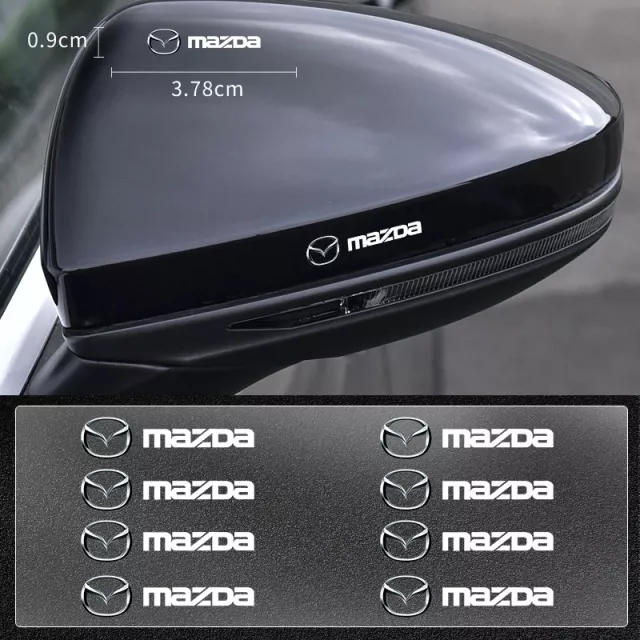
Fit and Compatibility Notes for Mazda Interiors
Mazda interiors often share a design language across models, but switch panels can still differ by model year, trim, and market. That’s why the most important step is verifying shape and layout before committing to placement.
- Match the sticker shape to the exact switch panel design; Mazda layouts can vary by model year and trim
- Confirm whether the driver’s panel has extra functions (window lock, auto up/down indicators) that change the surface geometry
- Check for curved edges, textured plastics, or recessed areas that may require extra care during placement
- If the car has aftermarket switch covers already installed, measure clearance so layers don’t interfere with button edges
Quick Pre-Check Before Ordering and Installing
| Check | What to Look For | Why It Matters |
|---|---|---|
| Switch layout | Number/position of buttons and any lock icons | Ensures the set aligns with your panel design |
| Surface texture | Smooth vs. grainy plastic | Affects adhesion and edge lift risk |
| Panel curvature | Flat plate vs. slight bend | Determines how carefully to press and set edges |
| Existing wear | Glossy rubbed spots, residue, silicone dressing | Cleaning is critical for long-lasting bond |
| Clearance | Button gaps and edges | Prevents rubbing or sticking after installation |
Material and Finish: What to Expect from Metal Accents
Metal accents tend to look more “factory” than soft overlays because the material catches light in a way that’s closer to OEM trim rings and interior hardware. That subtle reflectivity can make the driver’s switch area feel more deliberate—especially if your cabin already includes satin or brushed-metal details.
- Metal construction gives a firmer, more premium feel than soft vinyl overlays
- A metallic finish can better match other cabin accents (trim rings, knobs, and interior highlights)
- Edges should sit flush when properly pressed; any raised corners usually point to surface contamination or misalignment
- Avoid harsh chemicals and abrasive pads to keep the finish looking consistent over time
Adhesive performance is usually less about “how sticky” it is and more about surface prep. If you’ve ever applied automotive tape or trim, the same fundamentals apply: clean, dry, and pressed firmly. For general prep guidance, 3M’s resources on surface preparation are a helpful reference: 3M — VHB Tape Surface Preparation.
Installation Steps for a Clean, Centered Fit
A careful install is what separates a sleek, factory-style result from a sticker that looks slightly off. Give yourself a few minutes, good lighting, and a clean microfiber cloth.
For tight seams around the switch surround, a slim cleaning tool can help remove packed-in dust before you stick anything down. The 3-in-1 Bottle Gap Cleaner Brush is useful for getting into crevices without gouging the plastic.
Tips to Avoid Common Problems
One extra practical note: do adjustments while parked. Focusing on small interior tasks while seated in traffic can add distraction. The NHTSA’s guidance on staying attentive is worth keeping in mind: NHTSA — Distracted Driving.
Care and Cleaning After Installation
Where This Upgrade Makes the Most Sense
If you’re assembling a small “comfort and detail” cart along with your cabin refresh, a non-automotive add-on like the Portable Eye Massager can be a nice extra for long commutes—while the switch-area upgrade keeps the cabin looking cleaner every day.
FAQ
Will these interfere with the window buttons working normally?
When centered and pressed flat, they should not affect button travel. Interference typically happens if a piece overlaps the moving button edge or adds thickness where clearance is tight.
How do the stickers stay on—do they use adhesive backing?
They typically use a pre-applied adhesive layer. Long-term hold depends on proper cleaning, dry surface prep, and firm pressure along edges during installation.
Can they be removed later without damaging the original panel?
Removal is usually possible by gently warming the area and peeling slowly. Any leftover residue can often be cleaned with a mild adhesive remover that’s safe for interior plastics.


Leave a comment